
Problem-solving: Too Much Bad Light
1/8000th, f/11, ISO 200 … no problem
It is not the most difficult thing in the world to shoot a wedding. There is a lot going for us, from real emotion to built-in make-up artists to just how much loud music and an open bar can make people forget a photographer is there. But it is impossible to do perfectly, and in the in-between it requires a great deal of skill to achieve results up to yours and the clients’ standards consistently.
There are a lot of reasons for this, the main one being that word “consistently,” because there are many factors working against consistent quality. There are very few other sorts of professional portraiture where the time between first ever seeing your location and finishing the entire portrait shoot could be five minutes or less, still having the expectations of the utmost quality. We have some but relatively little control over time of photography, location, and certainly our subjects. Some photographers exert more control over their days than others, but I don’t know any photographers who, upon seeing the wedding dress for the first time, can say “Oh, honey no … what else do we have?”
And this is the sort of thing that inevitably leads to us having to take some of the most important portraits of a couple’s life at noon. On a cloudless day. On the summer solstice.
So many of the revolutions in digital photography over the past decade have been about increasing low-light quality, but ISO 1,000,000,000 doesn’t help you if there is lots of light, but that light sucks.
We all know it well — it translates to many things, from recessed overhead lights that make raccoon eyes to lights of terrible color that varies from millisecond to milliseconds, but the most common and in ways the most difficult is the sun, because at the wrong time of day and year, it’d terrible and it’s strong.
Sometimes we just have to manage expectations. I had to explain to one client that the wide shots of their Botanical Garden wedding photos would not look the same at noon as the samples they saw at a cloudy twilight, because mid-day sunlight looks just as bad on flowers as it does on people, and we didn’t have a spare week to set up Crewdson-level lighting to change the entire landscape:

But we want to provide as good results as we can always, and when it comes down to something the size and mobility of human beings, there are many ways to make the scene work for you, whatever the lighting.
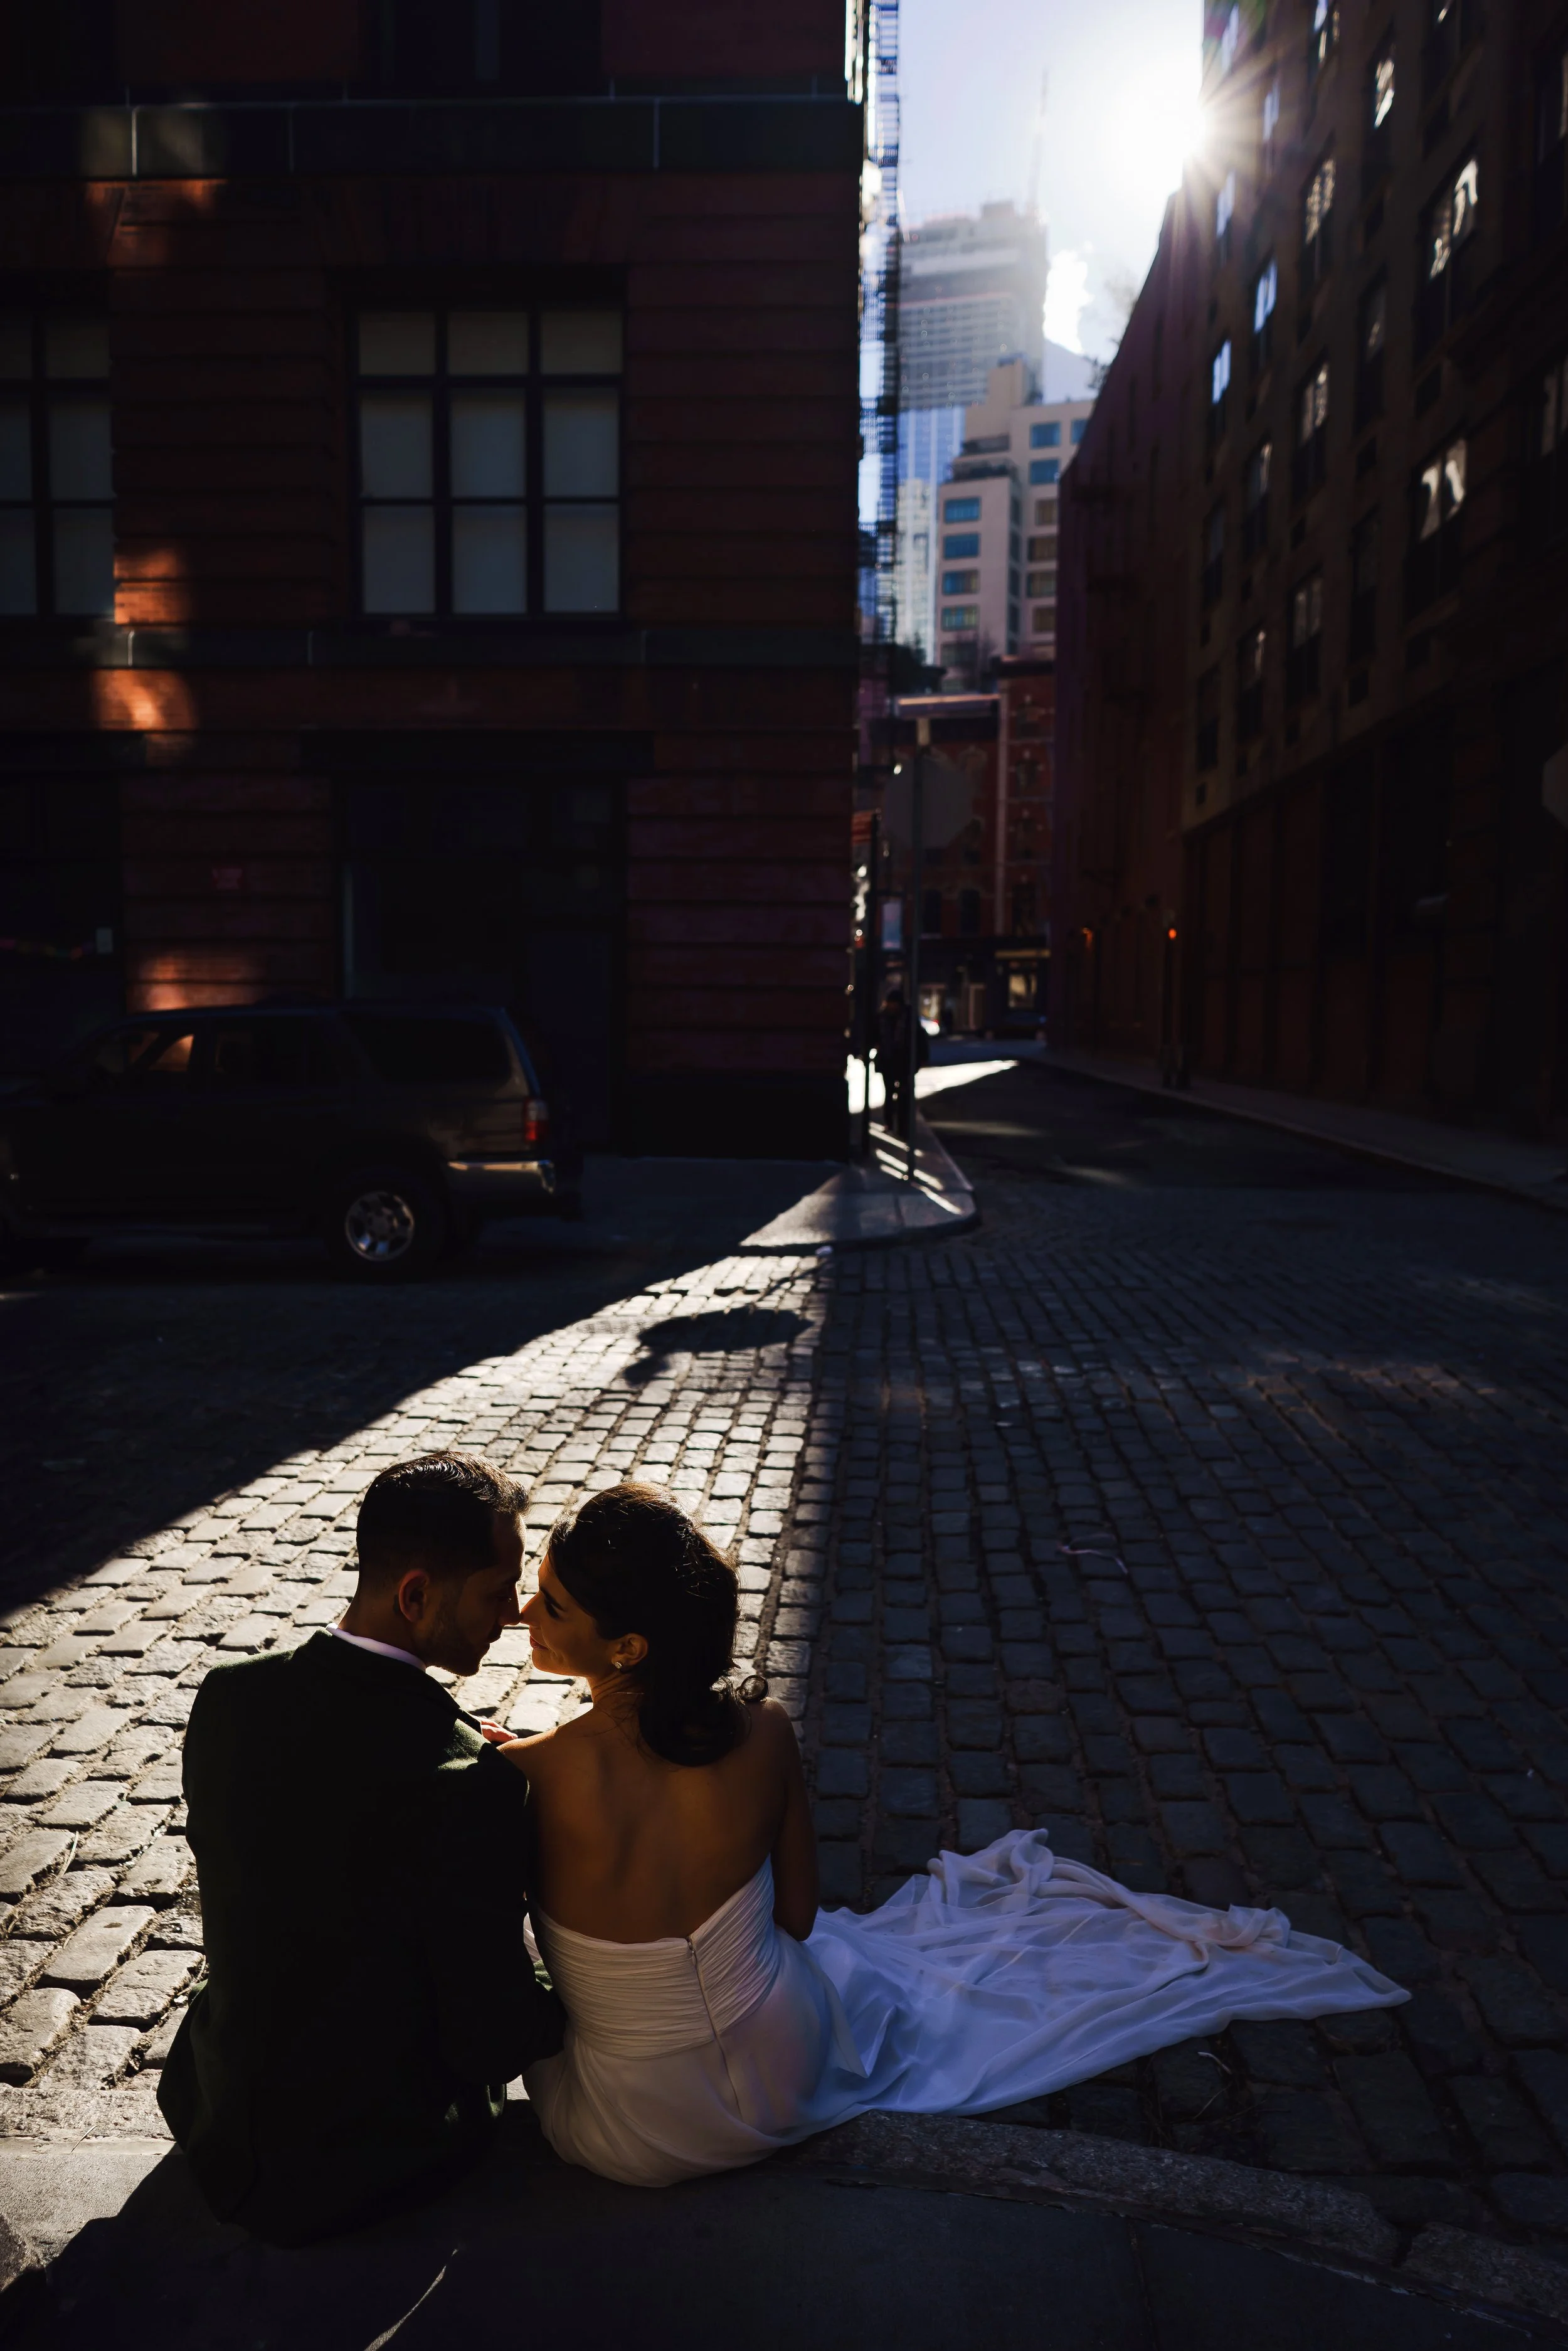
1. RUN TO THE SHADE
Just cheat. Go inside, find a forest. Duck under a rock, whatever. You know this one, you’ve done this one, we’ve done this one, your competition also does this one. I don’t need to tell you how to do this. What we want is to be able to free ourselves to shoot where you or your client want or need to at any time, anywhere.
2. WORK THE SHADY SIDE
Fun fact about Planet Earth: It only has one sun. And even though the sun itself is ginormous, it’s also really far away, and so from our perspective it’s just as pinpoint a light as a single light bulb. There’s always a shady side, and shooting into it allows everything from silhouettes to interesting flare, depending on your lens and exposure, as this mid-day shot shows.

Of course, if you happen to be shooting at noon on the solstice on the equator, than that shady side will be straight down, and the closer you get to that scenario, the less leeway you will have.
This is where one of the key skills of advanced wedding portraiture comes into play: figuring out the technical action a couple needs to take and then reverse-engineering the sort of situation that would give them a plausible emotional reason to create it.
One minimally-perceptible posing shift that can come in handy is having the couple put their body weight on the foot that is closer to you, which is a good way to communicate a slight lean without turning it weird and off-balance. Not only will this fill in some of the crags of cheekbones and such pointing into the mid-day sunlight, but we more often use this to counteract geometric distortion from shooting with a wide-angle lens aimed up toward the couple and sky (as often happens in mid-day when creating a silhouette, like this at 16mm)

(This also shows how important the time of year is, since away from the equator in the winter, mid-day isn’t all that mid-day. In December fear the temperature, not the noontime sun)
3. WORK THE SUNNY SIDE
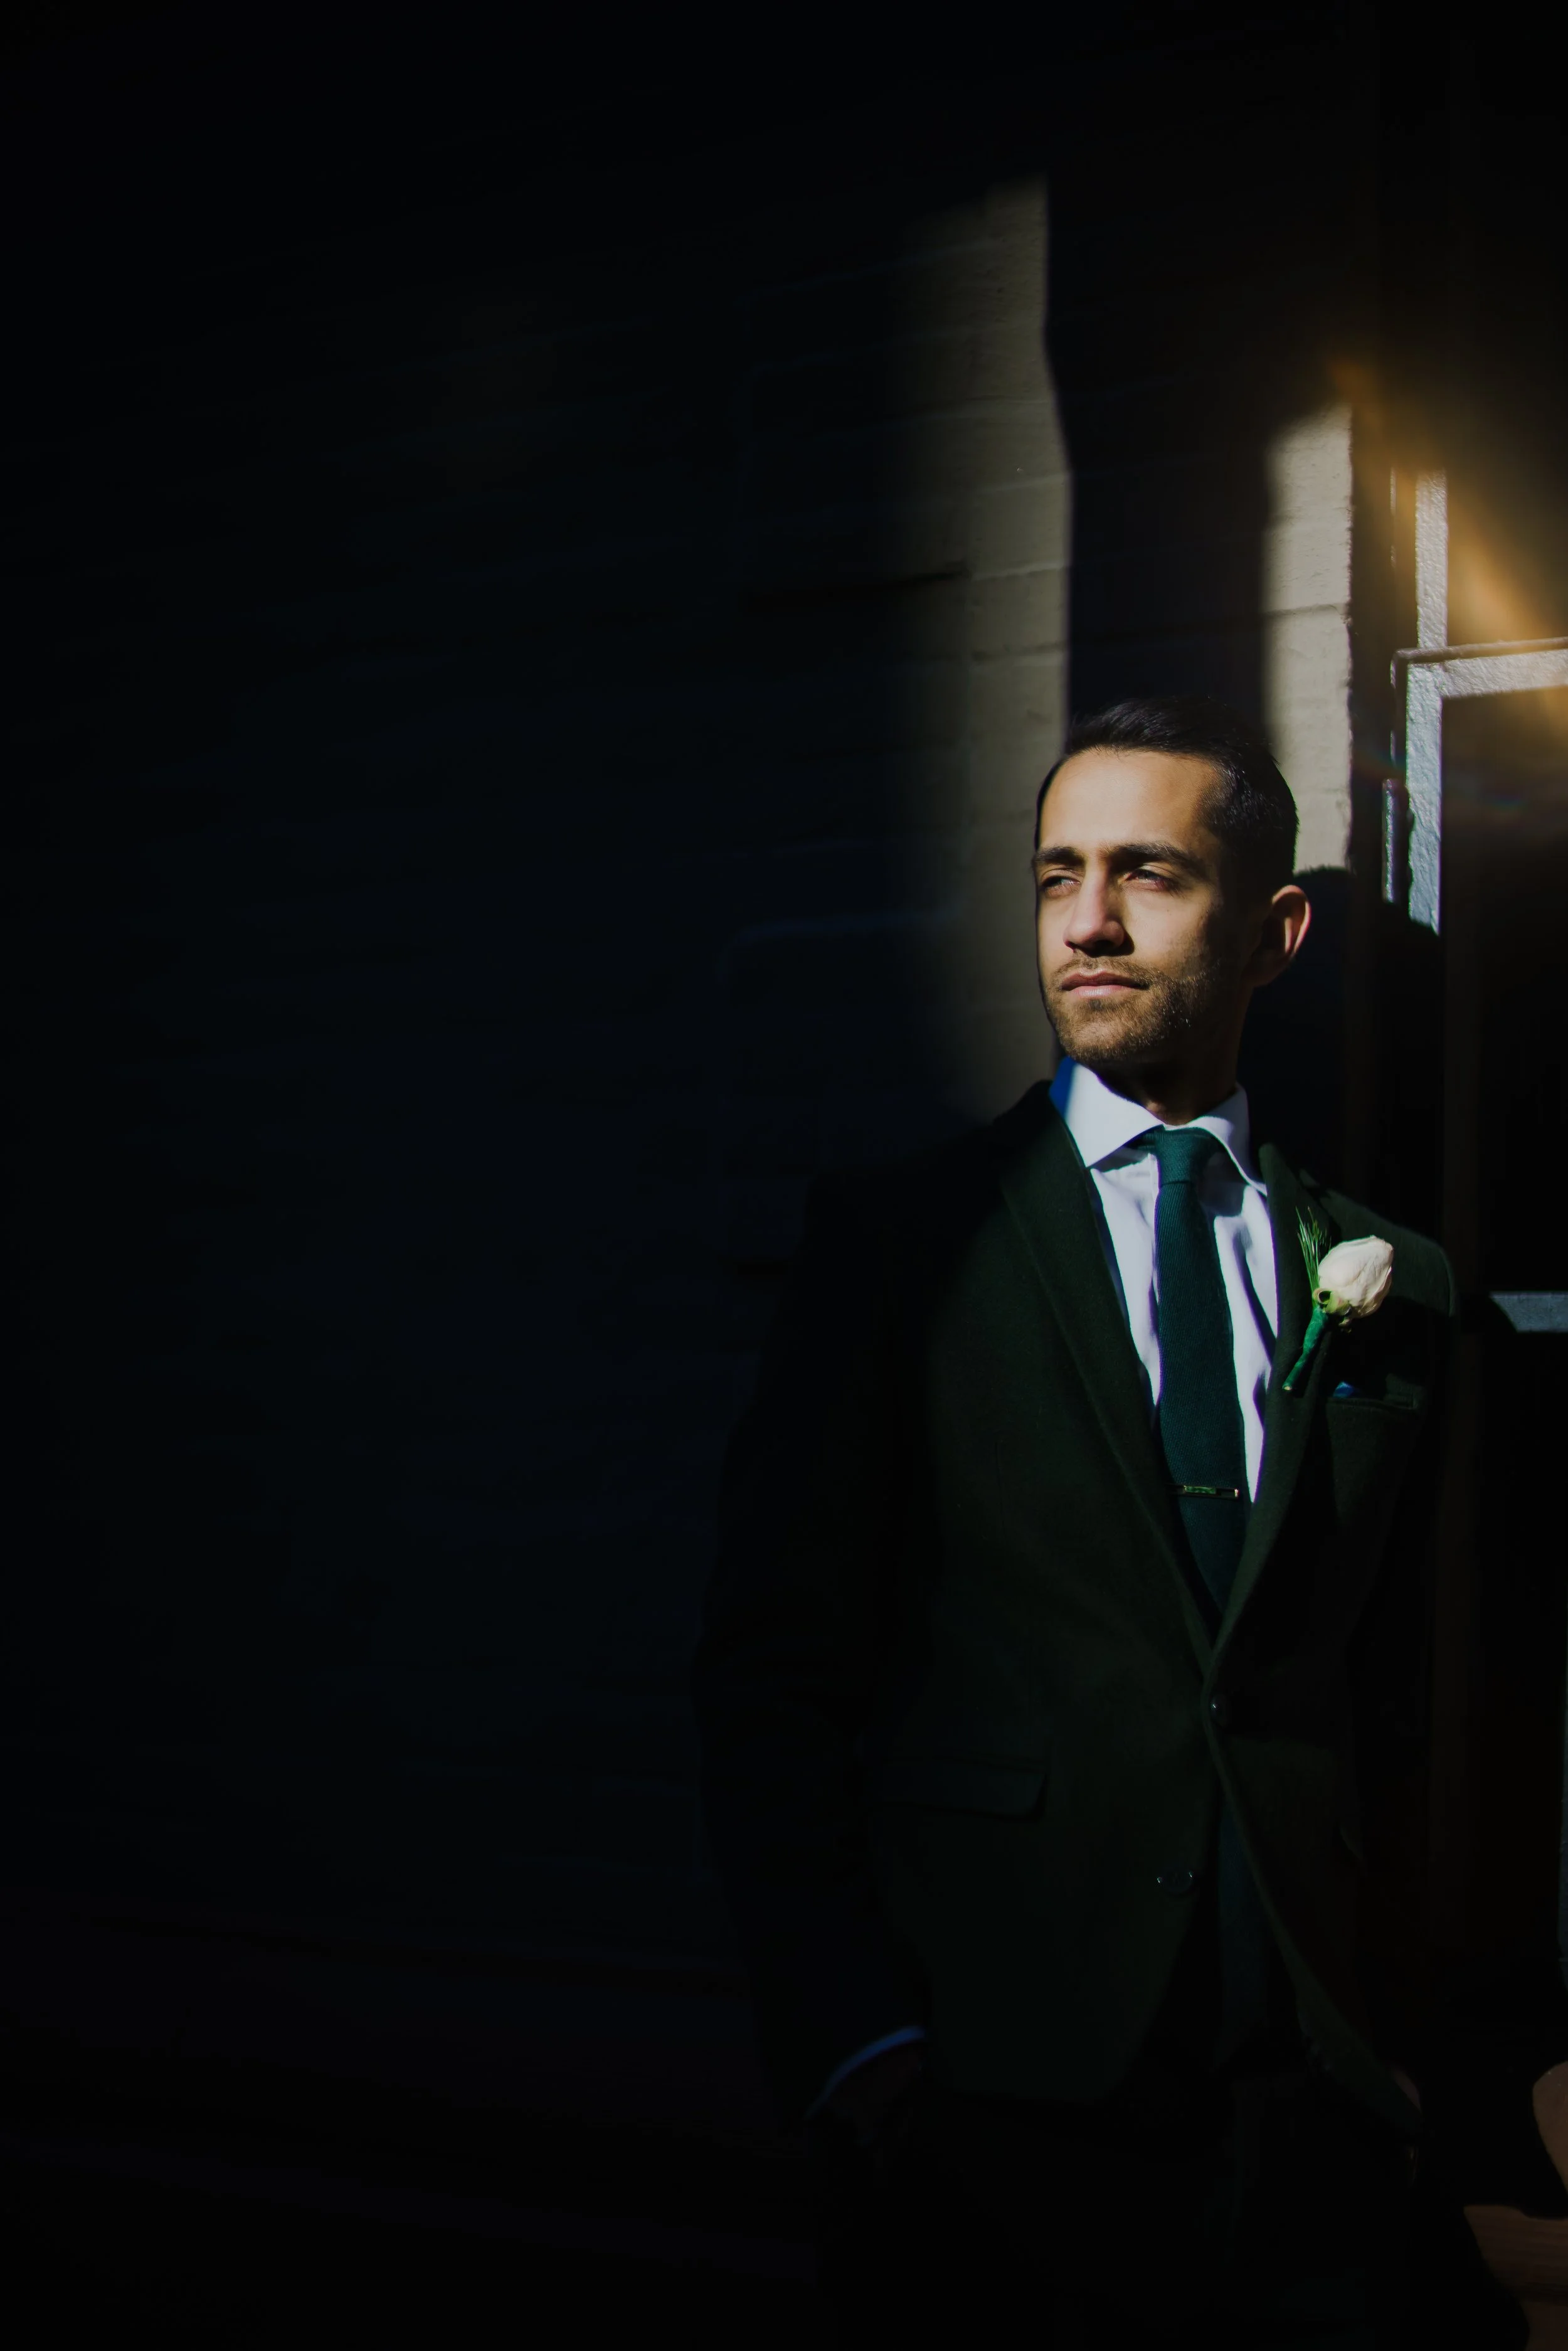
Hard light doesn’t mean bad light. It just means you need more precision in how you work with your couples, since a slight turn of a head can take the way it hits a face from amazing too terrible.
When working with any sort of hard light, I explain exactly that to my couples: There are some times where you can run and play and be very natural together, but with the kind of light we’re working with at the moment it is a game of inches. To work well with this, you have to be able to clearly communicate nuances of body language — a course in itself and best shown in-person, but the key actions are acting like a mirror for them and singling out one body part to move at a time.

This also doesn’t work with all people. Take a photo of my Irish self in hard light and all you will get is a photo of someone squinting very angrily.
4. FLASH ‘EM
Cameras can do just about anything with ambient light these days. High ISO is amazing enough, but we also have dynamic range for days, giving us more options for shooting into the shady side … exposures that once meant a silhouette can now be squeezed into any sort of tonal range you want.
But if the light is unflattering even near-infinite dynamic range just gives you an unflattering image with less contrast. If the capabilities of our cameras lull us into lighting laziness, that is all the more reason to improve your skills with flash … both in ability to create light that does what you want and in the ability to set it up quickly enough to be useful enough to actually do on a wedding day.
And that brings us to the Only Geeky Thing You Need to Know About Light: The Inverse Square Law.

Wait, math? Yeah, don’t worry, you know this already. Turn a light bulb on. Walk to the other end of the room. Look at it.
No problem. Now. Walk up and look at it from one inch away.
Don’t … don’t actually do that.
You get it already. That little 60-watt bulb becomes something that would scour your retinas out of your skull. As you get closer to a source of energy, it doesn’t just get stronger; it gets massively stronger. That shot at the top? Here is the uncropped version.

At 1/8000th of a second speed lights have very, very little power, but they were able to absolutely demolish the giant nuclear explosion of the sun because they were very, very close. The same effect happens here with the flash just out of frame to the upper-right:
We know that flashes get stronger as they get closer, but a number of important-to-understand things also happen:
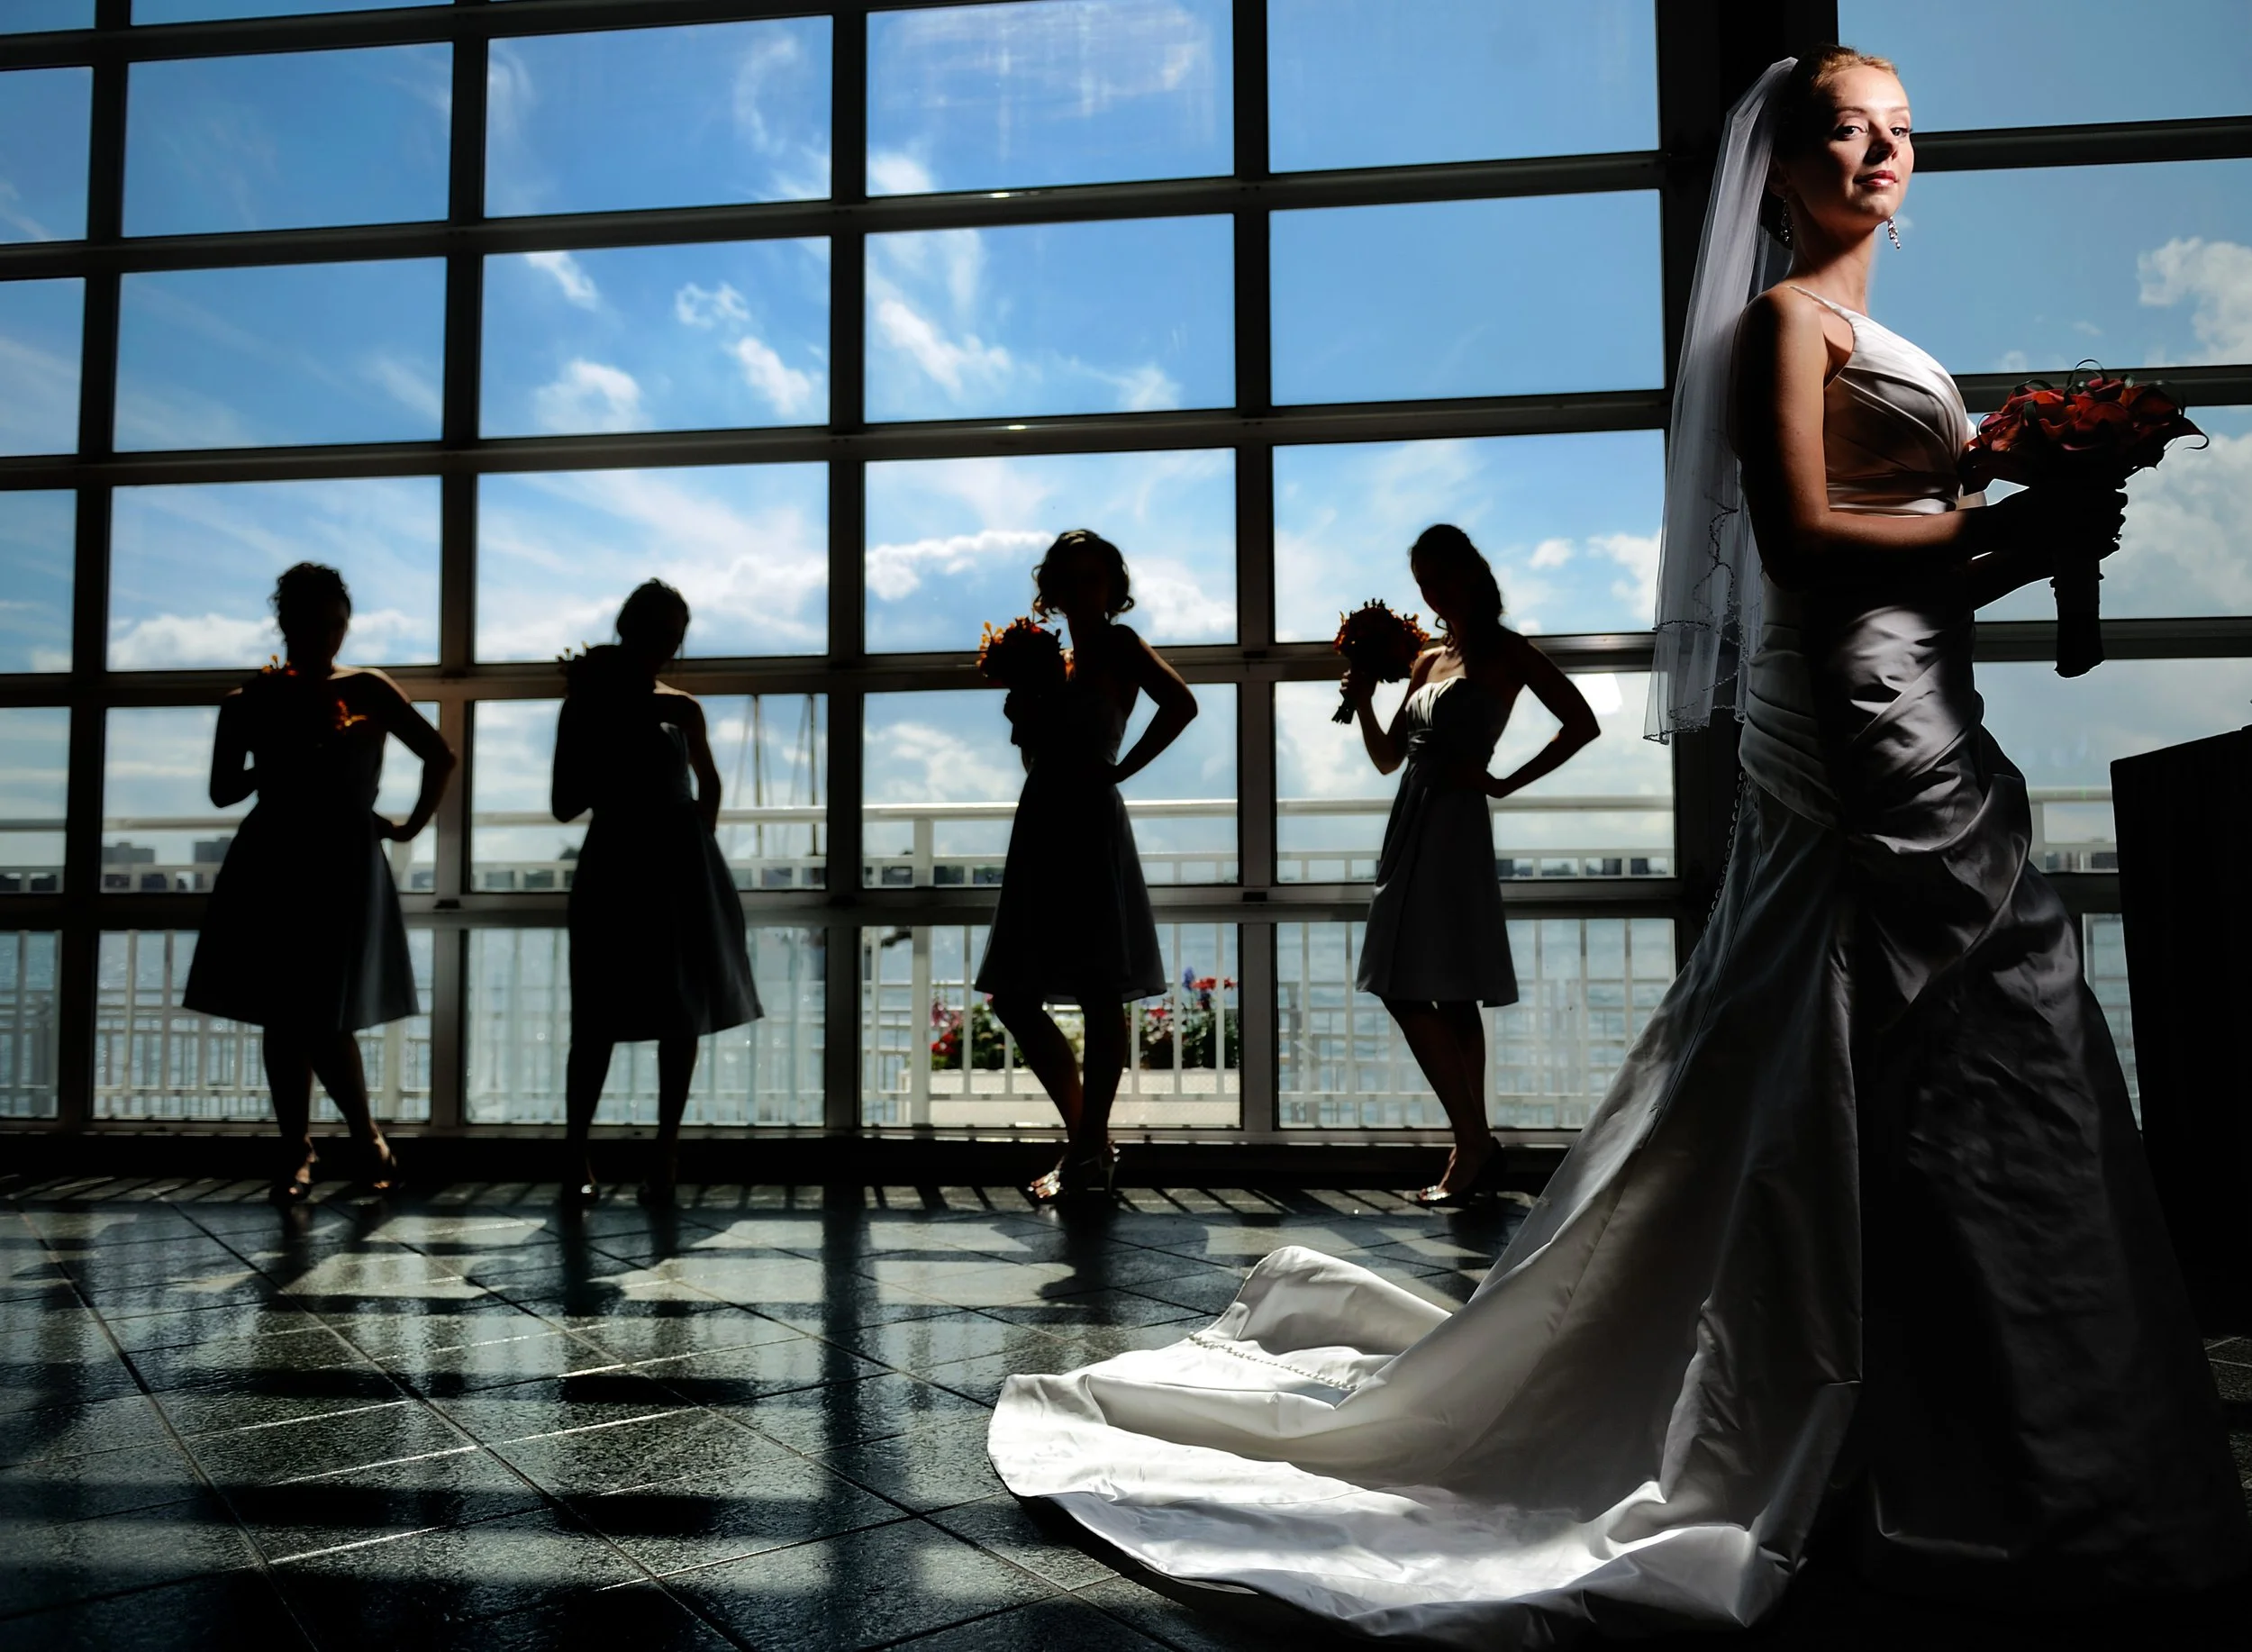
First, they get softer. The softness of a light has nothing to do with the actual size of the source, otherwise the sun would be the softest light imaginable. It’s all about how big it looks to the subject. The wedding party image was lit with a tiny 12-inch soft box, but it’s soft enough for my purposes from two feet away.
Also, you get increased fall-off in both roundabout and direct ways. First, the light doesn’t have as much room to spread, so there are parts of the scene that the beam is simply not hitting.
But the real meaning of fall-off is just another aspect of Inverse Square Law. See that sun? It’s so far away that from its perspective, every part of your body is exactly the same distance from it. Heck, from its perspective the peak of Mount Everest is basically the same distance away from it. But bring a light source one foot away, and one side of your face might only be 3/4ths as close as the other … which means only just about half as much light.
These factors work together to basically mean you are painting on light with a smaller brush … an amazing option to have if not the only option you would ever want.
Photographic composition means showing the things that make a photo better and not showing the things that make it worse. We most obviously compose with how we frame a shot in-camera at the time we take a photo, or composing after-the-fact through cropping.
But you can also compose a photo with light. Don’t light everything, and definitely not equally: Light in a way that guides the eye where you want it to go. Working with a “smaller brush: makes this easier.
There is one huge no-no in the photo above — sticking the bride in the corner of a 24mm frame! Instant addition of 20 pounds. The reason we get away with it is that we are entirely composing with light. The bridesmaids show that the shadow side of this image is completely black, since we are working with f/22 territory here. So whatever isn’t catching spill from the extremely bright background or my flash is close to gone. If her torso gained 20 pounds from perspective, it lost 30 from shadow. In an image that is overall bright in tone, we are able to take a white wedding dress and treat it with the precise contrast of chiaroscuro.
Interestingly, I had to go back to very old or workshop images to easily find examples where we only used the combination of the Inverse Square Law and framing to make it work. My philosophy is that wedding days are hard enough, so if I can cheat, I go for it. So we do compositing work to put the light wherever we want it to be to make the effect we want, without having to care whether that place is in the frame. But for many reasons that is a separate piece.
You don’t have to break out the Photoshop to take advantage of this. Just get close. You have to get creative for wider frames to counteract the perspective effects, but generally you should be able to light telephoto photos with whatever the heck you want.